Introduction
In fact, we are used the more files or data in the day to day life like photos, songs, presentation videos and documents. So in the present situation many peoples want to transfer files from Android to other PC like Windows, Mac and Chrome OS. Android phone is a key factor of the file transfer to other PC or transfer files from Android to Android.
Android mobiles is a robust computer which is permit you to access file systems directly from a desktop, without the need for any complicated procedures.
USB cable, Bluetooth, and cloud sync- these are the various options for transfer files from Android to PC. Alternatively, you might use an app like AirDroid, Pushbullet, Cloud Storage Apps, Google Drive, Dropbox, Feem, Resilio Sync and Xender. Finally you could go to email for transfer files.
Transfer files from Android to PC- it is a very easy way for done. Let’s see how to transfer files from android to PC in the below sessions.
USB Cables
Your phone and computer connected through USB cables, for micro-USB or USB-C on the phone side and USB-A or USB-C on the computer side, depending on the specifics of your devices. The latest all Android phones are using a USB-C type only.
Do you want to know more about ” USB C Port
Transfer files from Android to Windows Computers
First connect your android phone into computer USB port then turn on your phone’s screen and unlock the device. Then follow the below steps:
Step 1: Choose “Transfer files” or “File transfer” in the menu that appears and then choose the “Transfer photos” or “PTP” (If you want to be transfer photo and videos files).
Step 2: Open the File Explorer window, look for an icon representing your phone alongside other portable devices and drives.
Step 3: Click that icon, then you can now click around and browse folders, transfer files between your Android phone and PC.
Transfer files from Android to Mac Computers

A little bit of challenge is there for transfer files in mac computers than windows computer but it is possible to do.
The below three main things must be done before start the file transfer.
- You’ll need to download and install an official Google Program named “Android File Transfer”.
- Your mac must be running macOS 10.7 or later version.
- Your Android device must have Android 3.0 or later.
Step 1: Once the Android File Transfer program in your mac, then connect your phone into your computer and look the USB status notification.
Step 2: In the notification tap choose the “Transfer Files” or “File Transfer”.
Step 3: Now the “Android File Transfer” program should then automatically open on your Mac computers and you should be able to browse your phone’s storage and transfer files to your desired files and documents.
Transfer files from Android to Chrome OS Computers
Files transfer between the Android phones and Chromebooks – it is very easy way because Google’s the driving force behind both of those operating systems. It is simple as like as Android File Transfer for windows computers.
Step 1: Connect your Android phone to a Chromebook is plug it into open USB port.
Step 2: Tap the USB charging notification on the phone and choose either “Transfer files” or “File transfer” from the prompt that looks.
Step 3 : You can choose the “Transfer photos” or “PTP” – In this options will provide the special attention for multimedia files.
Step 4: Now the Chrome OS Files app should automatically appear on your Chromebook and it act as a one of the storage options.
Step 5: Now you have to transfer your files, photos and video by through drag and drop or you would follow in your own way.
Transfer files from Android to PC via Bluetooth
This one for best way for transfer files from android to PC, preferably for smaller size of files. All the Android phones and computer has built-in option for Bluetooth. So transfer data via Bluetooth file transfer from Android to Windows is good option. Before the perform these activities you should be enabled the Bluetooth in computer and android.
Find the below steps for transfer files android to PC through Bluetooth.
Step 1: On windows10, open the settings from menu, choose the Devices section and select the Bluetooth & other devices tab on the left.
Step 2: Click Add Bluetooth or other device. Select Bluetooth once more to commence the scan for compatible devices.
Step 3: Open the Quick Settings panel on Android by swiping down twice from the top of the screen then pair new device wait while your phone notices your computer and confirm that.
Step 4: The Bluetooth symbol in the System Tray at the bottom-right corner of your OC, once the connection established. Then right click it and choose the receive file and click Next to start file transfer.
Step 5: Go to Android browser or gallery app to choose your desired files to transfer. Then select Bluetooth to share the data, then pick your PC in the subsequent list by use share button.
Step 6: On the Windows 10 PC, you’ll see the received file listed in the Bluetooth File Transfer window. Click Finish to complete.

Transfer files from Android to Shared Folders (Windows)
File transfer from Android device to your shared folder in windows is very simple and easy way, if you are using an Android file manager.
You can be copying data to your PC from Android is straightforward by using the method of “ES File Manager” but a lot of other file managers also available in the Google play store. So buddy, you can find out those kind of file manager and use it.
Let’s see file transfer from Android device to windows shared folder using the ES File Manager in the below section.
Step 1: Go to the ES File Manager View on PC option you can open by tapping the menu and expanding Network.
Step 2: Enable the Turn-on option, here you can see one FTP Address. Copy the FTP Address into your PC’s web browser (or file manager).
Step 3: Now you can see the browsable folder structure in your Android device so here it’s easy to find the files you need to be share to your PC.
Step 4: Finally, you have find the desired files to transfer and right-click the file and copy to Folder. The click OK copy the data from your android device to your windows computer.
Transfer files from Android to PC with a USB Cable
It is a common and very simple way for transfer files from Android to PC using USB cable. Keep in mind important point to use this method, you must be use the original USB cable in all the time to avoid any unnecessary issues.
Connecting your Android device into computer may not simple like as using any app by Wi-Fi but connect the Android device into PC with USB is a certainly very effective manner.
If you are connecting your Android device into PC, Windows will try to install the relevant drivers first. Your phone may also install an Android file manager for your PC through USB, to open whenever the phone connects.
Please follow the steps for transfer files from Android to PC with USB cables.
Step 1: Connect your Android device to your PC, you will see the Allow Access notification, give Allow the Access.
Step 2: See the USB file transfer turned on and tap this to view the full preferences in notification menu. Here, you must confirm the files transfer selected so the devices can see the other.
Step 4: Finally, you will open the windows File Explorer and see the Android device. So once android device is connected, you will be able to browse the phone’s contents and copy data to your PC.

Transfer files Over Cloud Storage or Email
There are many application is available in cloud storage for transfer files into your systems. So you can use the different types of cloud storage app in day to day activities. The Google Drive and Dropbox., etc are very familiar cloud storage apps.
In the cloud storage apps are providing the automatic camera upload. Once you have installed the Google Drive or Dropbox in your computer, or any other cloud storage app then photos will automatically sync to your PC. Then you can copy any files or photo to the cloud folder on your Android device and sync it to Windows.
Transfer files Over Email
It is the one of the way for transfer files from Android to PC but you may have kept this option in at last chance because so many easy ways are available than emailing.
Use a third-party solution for files Transfer
Here’s will see about the two types of third-party solution for transfer files from Android to PC.
- AirDroid
- Pushbullet
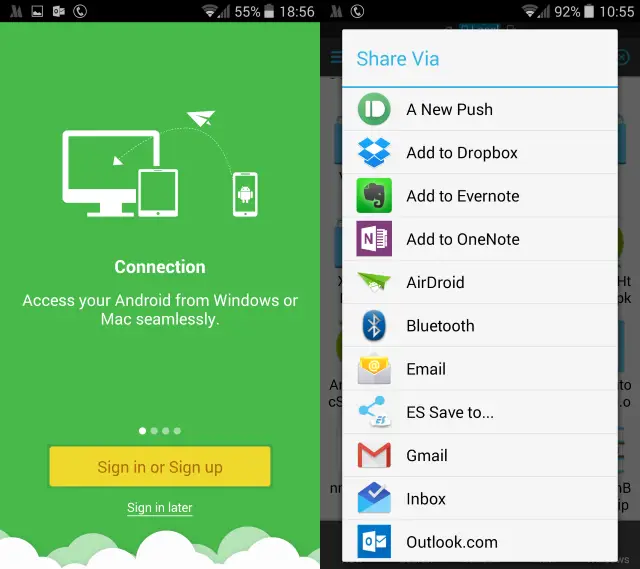
1.AirDroid

It is a one of the important app for Android users and also it is providing free and premium subscription. So you need to be creating an account or using any one social media accounts like Facebook Google or Twitter for login the Airdroid app.
If you need to be transfer files from your computer to Android device- Just use this app and drag and drop the file from your desktop into the AirDroid client.
Airdroid’s provides notification and tethering and at the same time file transfer to a PC also done in the same Wi-fi network.
Step 1: In the starting ime of opening the app, AirDroid will request permission to access calls, call logs, and media on your device and to use the app to its full competency, select “Allow” for these options.
Step 2: Then you should set to “ON” the “Files” options for file transferring, then go to Airdroid Download Page and grab the Desktop Client.
Step 3: Now, browse to the file you’re sharing, pick it, and use the sharing menu to find AirDroid. Select the file and send it on you phone.
2.Pushbullet

It is one of the file transfer app like as AirDroid. Pushbullet syncs files and notifications between your Android phone and computers.
Step1 1: On the installation time, you must to agree to access your media files. So click Allow then you will be in the home page of Pushbullet.
Step 2: You can sign in the web or client or download and install a windows app better for file transfer.
Step 3: If you need to be transfer the files from your computer, tap the menu button in the app and selecting “Pushing” then tap the paperclip icon, select your image, and hit the “Send” button.
Step 3: Just wait for a minute, the image will appear in the web client next to the name of the sending device. So immediately you can see the files and documents in your browser windows but it is possible if you are in the same network


