
Introduction
Can I encrypt a USB Flash Drive? Yes, you can encrypt a USB Flash drive using windows build-in features or use an other third party application.
USB flash drive are little storage extensions, it is used to easy to transfer data from one computer to another and they help you keep personal data off publicly accessed computers or workplace equipment.
In many cases the use of an encrypted usb flash drive is required for regulatory compliance or data protection law.
The easy way to confirm that data on flash drives is protected by encryption is to buy an encrypted a usb flash drive such as the Kruptos2, which encrypt data automatically in hardware and can be used on computers running Windows, Linux and Mac OS X.
One disadvantage to using any encryption system is that you control your own access to the data on your USB flash drive. For example, if you encrypt a USB flash drive with a Linux utility, you can only access those files by connecting the USB to a Linux system, and only one with that same encryption utility installed on it.
In this article, I am going to talk about some important methods and how you can implement them for encrypt a usb flash drive.
Method 1 – BitLocker on Windows

BitLocker used to encrypt a USB flash drive so whenever you connect the usb into system it will ask password, each time required a password to be connected to a PC.
It is a Windows utility that is free to use. The utility is package in with many versions of Windows and can be downloaded for others. The ability isn’t native to Windows 10 Pro, but there is a Windows 10 implementation available from the Microsoft website.
BitLocker Working Steps
Step 1: Open your computer, right-click on the drive and click on Turn on BitLocker.

Step 2: Choose “Use a password to unlock the drive” and enter and re-enter a password that will be used to unlock the drive.

Step 3: Save a recovery key or print the recovery key and keep it in a safe place. You will need this to access the drive if you ever forget the password.

Step 4: Click “Start Encrypting” to encrypt the drive and its current contents. Depending on the size of the drive, this may have taken.

Step 5: Once the process is done, your drive is an encrypted flash drive and you can only decrypt and access the contents after you supply the password.

Step 6: Insert the encrypted a usb flash drive in another Windows computer. A password entry window will pop up. After entering the correct password, the drive will be unlocked and you can access the files usually.

If you want to turn off BitLocker at a later point, Go to Control panel, System and Security, Bitlocker Drive Encryption.

Method 2 – VeraCrypt
VeraCrypt, Working Methodology
You don’t have to install VeraCrypt on your system. Instead, you can download it directly onto your USB flash drive. When you access the program, you just need to locate it on the memory stick through a file browser and double click on it.
VeraCrypt does require the presence of the Windows, Mac OS X, or Linux operating system in order to run.You don’t have to partition the stick in order to protect the files on it.
Its Operates in 3 modes.
- You can create a partition and encrypt that;
- You might opt for an encrypted container, which is a little like a password protected zip file;
- VeraCrypt can create a hidden, password protected folder on the main partition of the USB stick.
The encryption that VeraCrypt uses is AES with a 256-bit key. This is very strong encryption. VeraCrypt asks you to define a hash algorithm to generate pseudo-random numbers for a mixing algorithm.
This defaults to SHA-512, but you can option for
- SHA-256,
- RIPEMD-160,
- Whirlpool, or Streebog.
VeraCrypt creates two levels of security. You can have a hidden vault for your real data, which will be protected by one password, another a visible vault that will be protected by an altered password. This visible vault is called the “outer volume“.
Once VeraCrypt has formatted your USB flash drive, you can only access it through the VeraCrypt program. When you connect the USB stick to your system, it will pop-up in Windows Explorer, but you can only see the VeraCrypt program and the trap vault.
VeraCrypt, Encrypting Steps
Step 1: When you run the program, you’ll get a window with a group of drive letters and a few buttons. We want to start off by creating a new volume, so click on the Create Volume button.

- Create an encrypted file container – will create a virtual encrypted disk stored in a single file & you can data stored in the encrypted volume.
- Encrypt a non-system partition/drive – will encrypt your entire USB flash drive.
I have store some important information on one USB flash drive, I always go with encrypting the entire drive option.

Step 2: If you want something super secure, go with the hidden volume because it creates a second encrypted volume inside the first encrypted volume. You should save the sensitive data in the second encrypted volume and some fake data in the first encrypted volume.

Step 3: I would recommend going with the hidden volume for extra security. If you select the hidden volume option, make sure to pick Normal mode on the next screen so that VeraCrypt creates the normal volume and hidden volume for you.
Next, you have to choose the location of the volume.

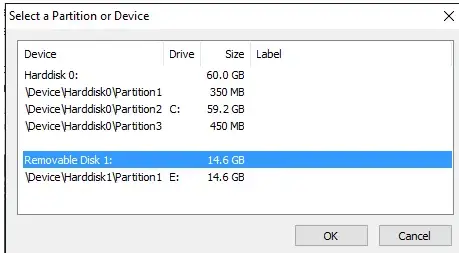
Step 4: Since my USB stick only had one partition, I ended up just choosing the /Device/Harddisk/Partition1 E: and it worked fine. If you chose to create a hidden volume, the next screen will set the options for the outer volume.

Step 5: If you have no idea of algorithm, just leave it at the default and click Next. The next screen will set the size of the outer volume, which will be the same size as the partition. At this point, you have to enter an outer volume password.

Step 6: On the next screen, you have to select whether you want to support large files or not. They recommend no, so only choose yes if you really need to store files larger than 4GB on the drive.

Step 7: Next, you have to format the outer volume and I would recommend not changing any of the settings here. The FAT filesystem is better for VeraCrypt. Click the Format button and it will delete everything on the drive and then start the creation process for the outer volume.
Once complete, you’ll be asked to go ahead and copy data to the outer volume. This is supposed to be your fake sensitive data.

Step 8: After you copy the data over, you’ll now start the process for the hidden volume. Here you have to select the type of encryption again, which I would leave alone unless you know what all that means.
You can make the size of the hidden volume smaller too if you like. That will give you extra room in the outer volume.

Step 9: Next, you have to give your hidden volume a password and then click Format on the next screen to create the hidden volume. Finally, you’ll get a message telling you how to access the hidden volume.

Step 10: To open VeraCrypt and first choose a drive letter from the list at the top. Then click on Select Device and choose the removable disk partition from the list. Lastly, click the Mount button.
Here you will be asked to enter the password. If you enter the outer volume password, that volume will be mounted to the new drive letter. If you enter the hidden volume password, then that volume will be loaded.
Now you have a super secure software encrypted a USB flash drive that will be impossible for anyone to access.

Method 3 – USB Flash Security

This software is available in both paid and free versions. The latest version of the software is only available for a fee. so you can only protect up to 4GB of data on a memory stick
The program encrypts the entire USB flash rive except for a small space that stores the unlocking program. Once this program is active on your memory stick, all that you will see on the stick through File Explorer is the executable file for the program, all other files on the stick are hidden.
When you set up a memory stick with encryption, the USB Flash Security program will wipe all data off the device. So first you need to backup your usb flash drive data.
USB Flash Security program doesn’t require a recovery key backdoor in case you forget your password. Its using AES 256-bit key for encrypt.
Method 4 – SecurStick

This program will encrypt stored data on your USB flash drive and still make those files available for computers running Windows, Mac OS, and Linux, this multi-platform support makes SecurStick nearly unique in the world of USB flash drive encryption.
The encryption program uses a browser-based interface, its creates a “Safe Zone” on your memory stick.
The encrypted vault and it does not need to covered the entire storage space of the stick. Once you have set up the Safe Zone on the memory stick, you just copy files into it through your standard operating system directory browser.
Encryption is performed with the AES cipher using a 256-bit key.
Its never ask admin rights for Encrypt and decrypt. The encryption it deals is the best you can get. The fact that you still have the flexibility to connect your memory stick to Windows, Mac OS, and Linux means that SecurStick’s usability beats the other encryption systems on this list. For all that, SecureStick is free to use.
Method 5 – LibreCrypt

LibreCrypt
LibreCrypt or called DosBox, which is available for Linux. The encryption program can only run on Windows, but encrypted files can be transferred to Linux systems.
This free program is available in two formats:
- To run on a computer and create the vault on your memory stick
- Portable Program that types the encrypted files accessible from any computer without having to install the LibreCrypt executable on it.
Once you create an encrypted vault for your files, that secure space is called a DoxBox. The DoxBox can be created as a partition on the USB stick, as a file, or you can allocate the entire memory stick to it.
You get a choice of encryption methods with this tool:
- AES,
- Twofish,
- Serpent.
LibreCrypt is available free of charge. There are no data processing limits and you can encrypt as several USB flash drive as you like.
Secure your USB stick
USB sticks have become vital for backing up important files and moving data from one place to another.
If Losing your USB flash drive shouldn’t be a security nightmare. Keep your data safe by installing one of the USB stick encryption systems on this list.
Final Words.
Hopefully, article gives you a good idea of how you can encrypt a usb flash drive and access it securely. Many encrypted programs are available in free of charge or also charge.


